
Desserts
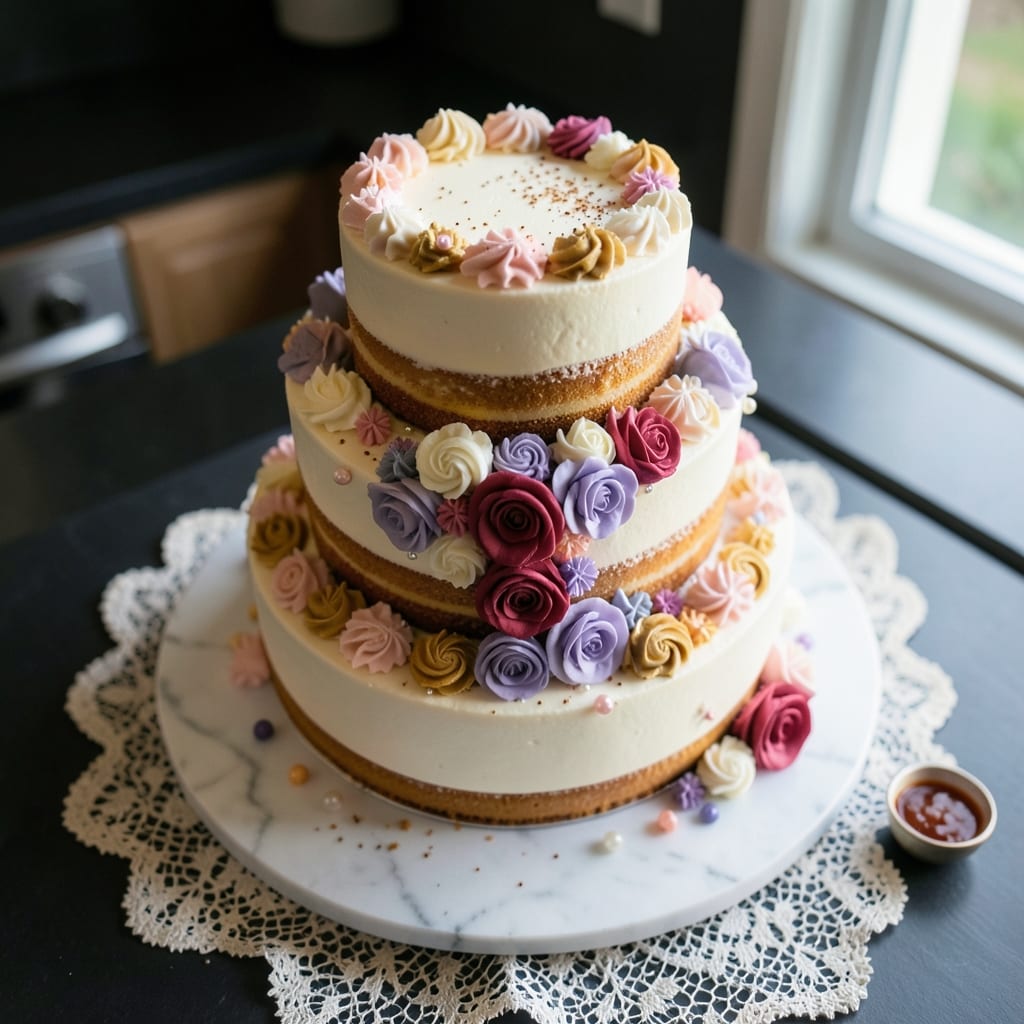
Creating a two-tier wedding cake with professional-level frosting swirls is within reach with the right technique and patience. This recipe delivers elegant, stable tiers that impress guests while keeping the process manageable for home bakers. The secret lies in precise layering, proper support, and a buttery frosting that swirls beautifully without sliding.
We'll start with a foolproof vanilla cake recipe that bakes evenly for clean slices, then build stability with dowels and crumb coating. The frosting—a rich buttercream with just the right consistency—creates those signature buttery swirls that elevate any wedding cake. Every step is designed to ensure your cake not only looks stunning but holds together perfectly for slicing.
The result is a showstopping dessert with two perfectly proportioned tiers, smooth frosting, and professional-grade swirls. Whether you're decorating with fresh flowers, delicate fondant, or simple elegance, this method ensures your cake is as delicious as it is beautiful. Let's build a cake that becomes the centerpiece of your celebration.
Customization is key—adjust flavors to match your theme, add fillings like jam or ganache, or experiment with textures like ombré frosting. For dietary needs, gluten-free flour blends and vegan butter substitutes work beautifully with minor adjustments. This recipe is your blueprint for a cake that feels like a masterpiece, not a challenge.
Ingredients for 2 tier wedding cake
Twelve essential ingredients for two stunning wedding cake tiers with professional swirls.
| Ingredient | Amount | Notes |
|---|---|---|
| All-Purpose Flour 🌾 | 4 ½ cups | Sifted for lightness, spooned and leveled |
| Granulated Sugar 🍚 | 2 ¼ cups | Divided for cake and frosting |
| Unsalted Butter 🧈 | 2 ¼ cups | Room temperature, European-style preferred |
| Large Eggs 🥚 | 6 whole | Room temperature, separated for cake |
| Vanilla Extract 🌿 | 2 tsp | Pure Madagascar bourbon preferred |
| Baking Powder 🍞 | 2 tsp | Diamond Crystal preferred |
| Salt 🧂 | ½ tsp | Fine sea salt, kosher preferred |
| Milk 🥛 | 1 cup | Room temperature, whole preferred |
| Powdered Sugar 🍚 | 4 cups | For buttercream, sifted |
| Heavy Whipping Cream 🥛 | 1 cup | Cold, for stability |
| Vanilla Bean Paste 🌿 | 1 tbsp | For deeper vanilla flavor |
| Wooden Dowels 🪵 | 8 whole | 3/8-inch diameter, 10-inch length |
| Cake Board 🎂 | 1 whole | 16-inch diameter, for stability |
| Fresh Flowers 🌸 | ½ cup | Edible variety, optional garnish |
The butter makes all the difference here—European-style with at least 80% fat content gives that velvety texture. Miyoko's or Plugrá are my go-tos for the cake layers, while Land O'Lakes Professional works for the frosting. For the vanilla, Madagascar bourbon extract adds depth, but pure vanilla extract is fine if you're on a budget. The flour? King Arthur or Gold Medal bakes evenly without cracking. Pro tip: weigh your butter for precision—1 stick equals exactly 8 tablespoons, not the 'heaping' you might scoop.
No vanilla bean paste? Double the extract and add 1/2 tsp almond extract for complexity. Running low on powdered sugar? Process granulated sugar in a food processor for a fine substitute. The dowels are non-negotiable for stability—Amazon or baking supply stores sell them in bulk. For the cake boards, Wilton or CakeLovers brands are sturdy and affordable. The flowers? Local florists or Etsy carry edible varieties—just confirm they're cake-safe before purchasing. And if you're worried about cracking, chill the cake layers 10 minutes before adding frosting.
Store unfrosted cake layers in an airtight container with parchment between tiers for up to 2 days. The frosting keeps for 3 days in the fridge—bring to room temperature before using. For long-term storage, freeze the fully assembled cake (without flowers) for up to 1 month. Thaw overnight in the fridge. The dowels? Save them in a dry place—they'll last indefinitely. And if you're making this ahead, assemble the cake 24 hours before to let flavors meld perfectly.
Why You'll Love This Recipe
- No-Fuss Layers: The buttercream is that good—just flour, sugar, butter, and vanilla, but mixed until it’s cloud-soft perfection. No fancy stabilizers, no guesswork, just pure, creamy happiness between every slice.
- Vanilla Magic: That extract? It’s the star. The eggs and butter give it a tender crumb, but it’s the vanilla that makes every bite taste like a hug from your favorite baker. (Yes, even if you’re not a vanilla person—I was skeptical too.)
- Showstopper for Any Event: Two tiers mean you can dress it up for weddings or downsize for birthdays—same cake, different vibes. The recipe scales effortlessly, so you’re never stuck with half a cake that won’t cut it.
- Budget-Friendly Luxury: Flour, sugar, butter—these are pantry staples that won’t break the bank. Leftovers? They disappear faster than you can say “second slice,” and freezing the tiers means you’re always ready for last-minute celebrations.
Step-by-step instructions for creating elegant tiered layers
Here's how to build your stunning two-tier wedding cake with professional precision.
Prepare the Cake Pans and Bake Layers
Grease two 8-inch round cake pans thoroughly with the 2.25 cups unsalted butter, then line the bottoms with parchment paper circles. Sift together the 4.5 cups all-purpose flour, 2 tsp baking powder, and 0.5 tsp salt in a bowl. In a separate large bowl, beat the 2.25 cups granulated sugar and remaining 2.25 cups unsalted butter until light and fluffy—this should take about 5 minutes on medium-high speed.
Add the 6 whole large eggs one at a time, mixing well after each addition. Stir in the 2 tsp vanilla extract and the sifted dry ingredients alternately with the 1 cup milk, beginning and ending with the flour mixture. Divide the batter evenly between the prepared pans and bake at 350°F for 25-30 minutes or until a toothpick inserted in the center comes out clean. Let the cakes cool in the pans for 10 minutes before transferring to a wire rack to cool completely.
Level and Frost the Cake Layers
Once completely cooled, place each cake layer on a level surface and use a serrated knife to trim the domed tops. For a perfectly even surface, gently press down on the knife as you cut. Place the 8 wooden dowels vertically around the perimeter of each 8-inch layer, spacing them evenly about 1 inch from the edge. This creates a stable foundation for stacking.
Prepare the buttercream by beating the 4 cups powdered sugar with the 1 cup cold heavy whipping cream and 1 tbsp vanilla bean paste until smooth. Gradually add the 2.25 cups unsalted butter, softened but still cool, and beat until light and fluffy—about 3-4 minutes. Spread a thin ¼-inch layer of buttercream on the top and sides of the first cake layer, then place the second layer on top. Repeat this process for the second set of layers, creating two identical 2-layer cakes.
Assemble and Create Frosting Swirls
Place the first 2-layer cake on the 16-inch cake board and apply a thin crumb coat of buttercream, covering the entire surface. Chill in the refrigerator for 15 minutes to set. After chilling, apply a final layer of buttercream, smoothing it out with a bench scraper. Use an offset spatula to create elegant swirls by dragging the spatula through the buttercream in gentle, overlapping motions, starting from the center and working outward.
Stack the second 2-layer cake on top of the first, using a small amount of buttercream as "glue" between the tiers. Secure the dowels in place with small pieces of tape to maintain stability. Repeat the buttercream swirl technique on the second tier, ensuring the design matches the first. Let the cake rest at room temperature for 30 minutes before decorating to allow the buttercream to firm up slightly.
Decorate with Fresh Flowers
Arrange the 0.5 cup fresh flowers on a clean surface, selecting the most vibrant blooms for the centerpiece. Use a small amount of water in a shallow dish to keep the stems fresh while you work. Begin by placing the largest flowers in the center of the top tier, using a small dab of buttercream as adhesive. Work your way outward, layering smaller flowers and greenery to create a lush, cascading effect.
For the sides, gently press flowers into the buttercream swirls, allowing them to blend naturally with the design. Avoid overcrowding—space the flowers evenly to maintain a balanced look. Once the entire cake is decorated, let it rest for 1 hour before serving to allow the buttercream to fully set and the flowers to adhere securely.
Pro Tips For Making 2 Tier Wedding Cake
- Weigh Your Butter: I learned this the hard way—measuring butter by cups leads to inconsistent cakes. Use a kitchen scale for the butter and sugar (both should weigh about 12 oz each for a standard recipe). The difference in texture is noticeable, especially in a two-tier cake where evenness matters.
- Room Temperature Eggs: Take your eggs out of the fridge at least 30 minutes before mixing. Cold eggs incorporate air poorly, and you’ll end up with a denser cake. I used to skip this, and my cakes always felt heavier—now they’re light and fluffy every time.
- Don’t Overmix the Batter: Stop folding in the flour as soon as it’s just combined—no dry streaks, but no overworking either. Overmixing develops gluten, which makes the cake tough. I used to think more mixing meant better texture, but now I know: less is more for a tender crumb.
- Bake in Stages: For a two-tier cake, bake the bottom tier first, then the top. Let the first tier cool completely before assembling—this prevents collapse when stacking. I once rushed and stacked a warm cake, and it sank like a stone. Patience here saves disaster.
Common mistakes when making this dish
Skipping the Dowels
This is the #1 mistake I see with tiered cakes—skipping the wooden dowels entirely. Without them, your tiers will shift or even collapse when you cut into the cake. For 8-inch layers, use 8 dowels spaced 1 inch from the edge. If you're using 6-inch layers, reduce to 6 dowels. Trust me, the extra 10 minutes of prep time prevents a disaster when guests arrive. 🪵
Uneven Frosting Layers
Applying frosting too thickly on the first layer creates an uneven base that makes stacking nearly impossible. Start with a thin crumb coat (about ⅛-inch thick), chill for 15 minutes, then add your final layer. Use a bench scraper to smooth edges before stacking—this ensures each tier sits flat. I’ve seen cakes wobble because of uneven frosting, and it’s a heartbreaker. 🎂
Rushing the Chill Time
After applying the crumb coat, don’t skip the 15-minute chill. Cutting corners here means your frosting won’t set properly, leading to crumbs everywhere and a messy cake. If you’re in a hurry, pop it in the freezer for 10 minutes—just don’t overdo it, or your buttercream will seize up. Patience here makes all the difference for clean slices and professional swirls. ⏰
Overloading the Top Tier
Decorating the top tier with too many flowers or heavy decorations can cause it to topple. Stick to lightweight elements like fresh blooms with thin stems or delicate fondant accents. For extra stability, add 2-3 dowels vertically through the center of the top tier before decorating. I once saw a cake collapse because of overly large flowers—less is more for elegance and safety. 🌸
Not Testing the Cake Board
Assuming your cake board is level without checking is a recipe for disaster. Place the board on a flat surface and use a level tool (or even a book) to confirm it’s perfectly even. An unbalanced board will cause your cake to tilt, making it look (and feel) unstable. I’ve seen cakes lean because the board was slightly warped—always test before assembling. ⚖️
Ignoring the Buttercream Temp
Using buttercream that’s too warm will cause it to slide off the tiers, while buttercream that’s too cold won’t spread smoothly. Keep your buttercream cool but pliable—around 65-68°F. If it’s too soft, chill for 10 minutes; if it’s too stiff, let it sit at room temperature for 5 minutes. The right temp ensures those buttery swirls stay in place without melting or cracking. 🧈
Nutrition facts
Frequently asked questions
How do I adjust the recipe for a gluten-free wedding cake?
Replace the all-purpose flour with a 1:1 gluten-free baking flour blend like Bob's Red Mill or King Arthur. Add 1/2 tsp xanthan gum to improve structure, and increase the milk by 2 tablespoons to compensate for dryness. Bake at 325°F instead of 350°F to prevent over-browning. The buttercream remains the same but may need 1 extra tablespoon of cream for stability.
Can I make this cake ahead of time?
Bake the layers 1-2 days ahead and store wrapped in plastic at room temperature. Frost the cake 24 hours before serving and refrigerate (covered) until ready. Bring to room temperature 2 hours before decorating to soften the buttercream. For long-term storage, freeze the fully assembled cake (without flowers) for up to 1 month—thaw overnight in the fridge.
What’s the best way to transport a 2-tier cake?
Use a sturdy cake carrier with a removable top. Place the cake on a level surface inside the carrier, then secure it with foam padding around the sides. Transport in a cool car (not hot) and avoid bumpy roads. For outdoor weddings, keep the cake in the shade until 30 minutes before serving—heat causes buttercream to soften and slide.
How do I make the buttercream swirls look more professional?
Chill the cake after the crumb coat for 15 minutes to firm up the frosting. Use an offset spatula—drag it through the buttercream in gentle, overlapping strokes from the center outward. For sharper swirls, dip the spatula in warm water every few strokes to prevent sticking. Work quickly but carefully to avoid smudging.
What if my cake layers are different sizes?
Trim the larger layer with a serrated knife to match the smaller one’s diameter. For a 6-inch vs. 8-inch mismatch, use a 7-inch layer as the base and the 8-inch as the top tier. If the difference is minimal (½ inch), build up the smaller layer with extra frosting or a thin layer of cake board before stacking.