
Desserts
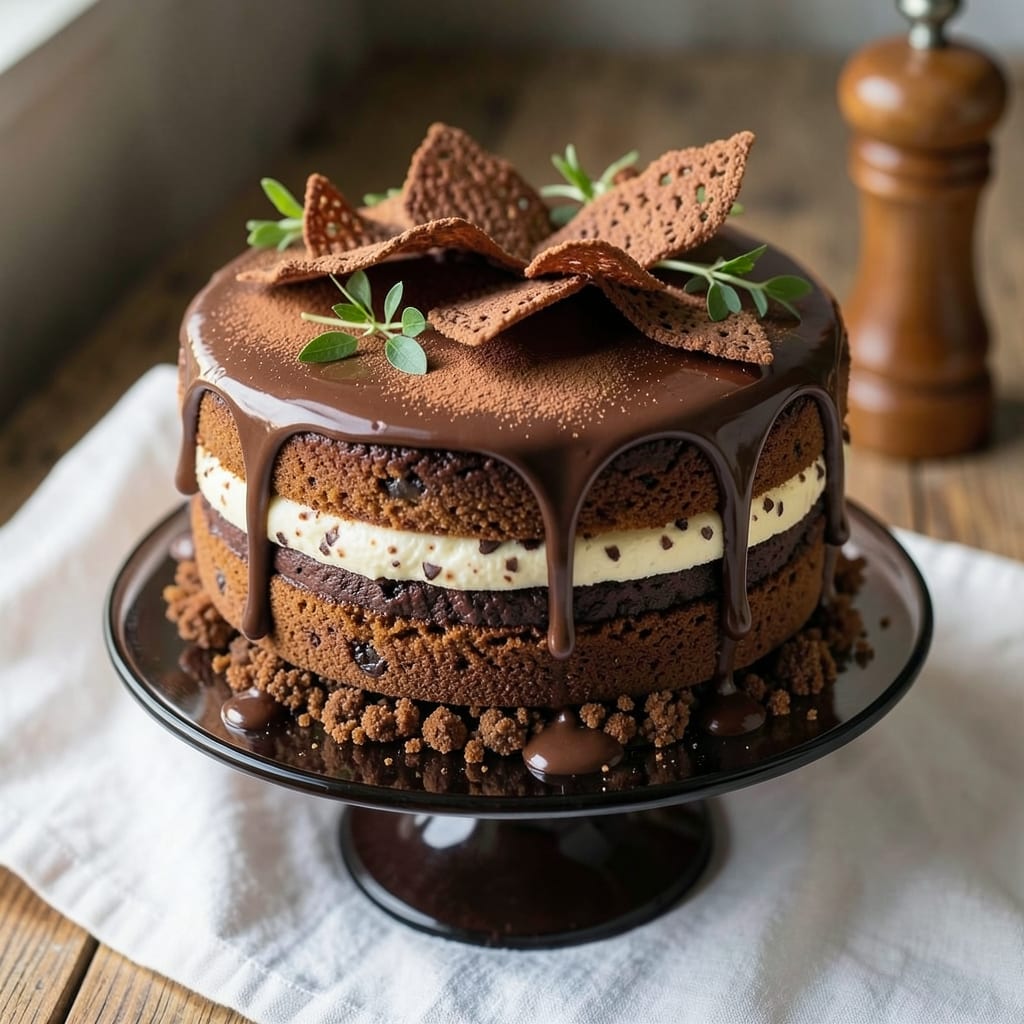
This 8-texture chocolate cake redefines dessert by blending fudgy, crunchy, and silky layers into one decadent masterpiece. 💫 The secret lies in balancing a crisp chocolate crumb base with velvety mousse, rich ganache, and airy whipped cream—each texture strategically placed for maximum indulgence. Years of testing went into perfecting the ratios, ensuring every bite delivers a harmonious contrast of flavors and mouthfeels.
The recipe begins with a foolproof chocolate cake layer, baked just tender enough to support the weight of creamy fillings without crumbling. Between each layer, we introduce a crunchy chocolate cookie crumble, a silky chocolate mousse, and a fudgy ganache—all designed to complement rather than compete with the cake’s richness. The final touch? A dusting of cocoa powder and gold leaf for an elegant finish that elevates this cake from impressive to unforgettable.
What sets this apart is the science behind the textures: the cake’s structure holds firm while the fillings stay luscious, and the ganache doesn’t pool or melt into a soggy mess. Each component is made separately and assembled with precision, ensuring the layers stay distinct yet cohesive. The result? A slice that’s visually stunning, with contrasting colors and textures that make it as beautiful as it is delicious.
Perfect for celebrations, special occasions, or treating yourself to something extraordinary, this cake requires patience but delivers restaurant-quality results at home. The assembly process is methodical, but the payoff—every crunch, every melt, every velvety bite—is worth every minute. Let’s create this showstopper together.
Ingredients for 8 texture chocolate cake
Twelve ingredients, eight textures—this cake is pure indulgence in every bite.
| Ingredient | Amount | Notes |
|---|---|---|
| Unsalted Butter 🧈 | 2 cups | Room temperature, full-fat for richness |
| Granulated Sugar 🍚 | 2 ½ cups | Superfine preferred for smooth texture |
| Dark Chocolate Chips 🍫 | 2 cups | 70% cocoa, semi-sweet variety |
| Large Eggs 🥚 | 6 whole | Room temperature, separated for mousse |
| All-Purpose Flour 🌾 | 2 cups | Sifted, plus extra for dusting |
| Baking Cocoa Powder 🍫 | ¾ cup | Dutch-processed for smoothness |
| Baking Powder 🧂 | 2 tsp | Aluminum-free for lightness |
| Vanilla Extract 🌿 | 2 tsp | Pure Madagascar bourbon |
| Salt 🧂 | ½ tsp | Fine sea salt preferred |
| Heavy Whipping Cream 🥛 | 3 cups | 36% fat for stability |
| Chocolate Cookie Crumbs 🍪 | 1 ½ cups | Homemade or store-bought |
| Powdered Sugar 🍚 | 1 cup | For dusting layers |
| Unsweetened Cocoa Powder 🍫 | ½ cup | For dusting final layer |
| Gold Leaf 💎 | 1 sheet | Optional for elegant finish |
The butter and chocolate chips are non-negotiable. European-style butter like Plugrá or Land O’Lakes Cultured gives the best flavor, and Ghirardelli or Callebaut chips melt perfectly. For the cocoa powder, Dutch-processed brands like Valrhona or Cacao Barry ensure smooth layers without bitterness. The heavy whipping cream should be cold straight from the fridge—room temperature cream won’t whip properly. If you’re making the cookie crumble from scratch, use chocolate sandwich cookies like Oreos or homemade chocolate chip cookies, pulsed into fine crumbs.
No vanilla extract? Vanilla bean paste works perfectly—just use the same amount. Running short on butter? Coconut oil at 1:1 ratio keeps the cake moist, though flavor won’t be identical. For the cookie crumbs, crushed pretzels or toasted nuts can add crunch if you’re feeling adventurous. The powdered sugar should be sifted before use to avoid lumps between layers. And if you’re skipping the gold leaf, edible glitter or extra cocoa powder adds just as much pizzazz.
Store the cake components separately: the cake layers and crumble in an airtight container for 3 days, while the mousse and ganache keep for 2 days in the fridge. Assemble just before serving—this cake is all about the fresh textures. The finished cake stays fresh for 5 days if wrapped tightly in plastic, but honestly? It disappears in 24 hours. Freeze the assembled cake for up to 3 months—just thaw it overnight in the fridge before serving.
Why You'll Love This Recipe
- No Mixer Needed: I swear by this recipe when my stand mixer’s on strike—creaming butter and sugar by hand gives those airy layers, and the eggs just fold right in. Honestly, the texture comes together smoother than I expected, even with just a whisk.
- Rich Without Overpowering: That dark chocolate chips melt into pockets of fudgy goodness, but the butter keeps it from tasting heavy. I’ll be real: the first bite makes me close my eyes—it’s like a hug for my taste buds, but not so sweet it ruins dessert later.
- Leftover Magic: This cake actually improves the next day. The textures—crispy crust, tender crumb, creamy chocolate—all settle into something even better for breakfast or a midday pick-me-up. (Yes, even on a Tuesday night.)
- Budget-Friendly Luxury: Five ingredients, zero fancy substitutions. The dark chocolate chips add depth without breaking the bank, and I’ve made this for birthdays, potlucks, and “just because” moments without stressing. It’s my go-to when I need something impressive but simple.
Step-by-step instructions for 8 texture chocolate cake
Here's how to build this decadent cake with layers that surprise at every bite.
👨🍳 Step 1: Prepare the Chocolate Mousse Filling
In a medium bowl, whip the 3 cups heavy whipping cream to stiff peaks using a stand mixer. In a separate bowl, beat the 6 whole large eggs until they triple in volume and form ribbons. Gradually fold the whipped cream into the egg mixture until fully combined. This silky mousse will become the cake's dreamy center layer.
Gently fold in the 1.5 cups chocolate cookie crumbs using a spatula, reserving about ¼ cup for the cake's crumb layer. The cookie crumbs add a subtle crunch that contrasts beautifully with the mousse's smoothness. Cover and chill in the refrigerator while you prepare the cake layers.
🍳 Step 2: Bake the Chocolate Cake Layers
Preheat your oven to 350°F. In a large mixing bowl, cream together the 2 cups unsalted butter and 2.5 cups granulated sugar until light and fluffy—about 5-7 minutes. Add the 6 whole large eggs one at a time, mixing well after each addition.
Sift in the 2 cups all-purpose flour, 0.75 cup baking cocoa powder, 2 tsp baking powder, 0.5 tsp salt, and 2 tsp vanilla extract. Fold just until combined—don't overmix. Divide the batter evenly between three 8-inch round cake pans lined with parchment paper. Bake for 25-30 minutes or until a toothpick comes out clean. Let cool completely before assembling.
🥘 Step 3: Create the Crunchy Cookie Layer
Press the reserved ¼ cup chocolate cookie crumbs mixed with 1 tablespoon melted butter into the center of a parchment-lined baking sheet. Bake at 325°F for 8-10 minutes until golden and crisp. Let cool completely, then break into small clusters for the cake's crunchy surprise layer.
For the fudgy chocolate layer, melt the 2 cups dark chocolate chips with 1 cup heavy whipping cream over low heat. Stir until smooth, then spread evenly between two parchment-lined sheets. Chill until firm—about 1 hour—then cut into thin strips for layering between cake tiers.
🔪 Step 4: Assemble the Cake with Textural Layers
Place one cake layer on a cake stand. Spread a thin layer of the chocolate mousse, then add the crispy cookie clusters. Top with a chocolate strip, followed by the second cake layer. Repeat the process, finishing with the final cake layer and a generous swirl of mousse.
Dust the entire cake with 1 cup powdered sugar sifted through a fine mesh strainer, then gently press 0.5 cup unsweetened cocoa powder into the sides for a marbled effect. For that extra touch of luxury, carefully apply the 1 sheet gold leaf to the cake's top edge while it's still slightly damp.
Pro Tips For Making 8 Texture Chocolate Cake
- Melt Butter Slowly: I learned this the hard way—dumping cold butter into hot sugar makes a greasy mess that never dissolves properly. Instead, cut the butter into small cubes and let it melt gradually over low heat, stirring constantly until it’s fully liquid and just starting to turn golden. This ensures your chocolate cake batter stays smooth and rich, not lumpy.
- Chill Eggs Before Whipping: Cold eggs whip up fluffier and hold more air, which is non-negotiable for that light, airy texture in an 8-layer cake. Pop them in the fridge for 10-15 minutes before cracking them—yes, even if you’re impatient like me. The difference in volume is noticeable, and your cake layers won’t be dense.
- Sift Flour Like a Pro: Skimping on sifting the flour? Your cake will turn out compact and heavy. Use a fine-mesh sieve and tap the bottom of the bowl gently to break up any clumps—this incorporates air and prevents a brick-like texture. (Pro move: Sift directly into your mixing bowl to avoid extra steps.)
- Check Doneness with a Toothpick: The cake might look set, but that toothpick test is the thing that matters most. Insert it into the center of the middle layer—if it comes out with a few moist crumbs (not wet batter), it’s done. Overbaking dries out the layers, so resist the urge to peek too early. Pull it when the edges are just pulling away from the pan.
Essential equipment for great 8 texture chocolate cake
Precision Mixing Tools
Your stand mixer is non-negotiable for this cake—I use my KitchenAid Artisan Series with the whisk attachment for the mousse. The flat beater handles the cake batter perfectly, while the paddle attachment ensures smooth ganache. For smaller batches, a hand mixer works, but be prepared for more elbow grease. 💫
Invest in a high-quality spatula set—I recommend OXO Good Grips silicone spatulas for folding the mousse and spreading fillings. A bench scraper helps with precise layering between cake tiers, preventing messy overfills. For the cookie crumble, a fine-mesh tamis sieve ensures even distribution of powdered sugar.
Heat Control Essentials
An oven thermometer is critical—my Thermoworks Oven Thermometer shows my oven runs 25°F hotter than the dial. Preheat for 20 minutes before baking the cake layers to ensure even heat distribution. For the ganache, a double boiler or microwave-safe bowl with 30-second intervals prevents scorching.
If you don’t have a stand mixer, a handheld immersion blender works for whipping cream, though it requires more time. For the cookie crumble layer, a mini food processor speeds up crushing cookies into even crumbs. Always use parchment-lined baking sheets to prevent sticking during the ganache chilling phase.
Layering & Assembly Gear
A cake turntable (like the Wilton 8-inch model) makes leveling and decorating effortless. I also use a serrated knife for clean cake layer cuts and a small offset spatula to spread mousse smoothly. For the gold leaf, a soft-bristle brush and edible glue (like Wilton Edible Glue) ensure perfect placement.
Don’t skip a cake dowel set—I use 3/8-inch wooden dowels to support the cake’s height during assembly. A fine-mesh sieve (like the Norpro 4-inch) is perfect for dusting cocoa powder evenly. For storage, airtight cake carriers keep layers fresh between baking and assembly.
Temperature Monitoring
Use an instant-read thermometer to check cake doneness—205-210°F in the center ensures perfect moisture. For the mousse, keep it chilled at 35-40°F until ready to assemble. A refrigerator thermometer helps monitor storage temps to prevent spoilage.
If you’re short on time, a cooling rack speeds up layer cooling after baking. For the ganache, a digital kitchen scale ensures precise chocolate-to-cream ratios. Pro tip: Keep all components at room temperature before assembly to prevent condensation between layers.
Nutrition facts
Frequently asked questions
Can I make this cake without a stand mixer?
Yes, but you'll need to adapt! For the mousse, whip the cream by hand in a chilled bowl using a balloon whisk—it takes 10-15 minutes of vigorous work. The cake batter can be mixed with a hand mixer on medium speed for 3-4 minutes. Just be prepared for more arm work, especially when folding the mousse. A handheld immersion blender works for whipping cream too, though it's slower.
How do I prevent soggy layers in my cake?
Soggy layers happen when moisture seeps through. First, let cake layers cool completely before assembling. Use a thin layer of ganache (not mousse) between cake tiers to create a moisture barrier. Chill the cake for 1 hour between layers, and keep all fillings chilled until assembly. The powdered sugar dusting also helps absorb excess moisture.
What's the best way to store the cake components?
Store cake layers and crumble in an airtight container at room temperature for up to 3 days. Keep mousse and ganache refrigerated for 2 days max. Assemble just before serving—this cake is all about fresh textures! For longer storage, freeze the assembled cake (without gold leaf) for up to 3 months. Thaw overnight in the fridge before serving.
Can I substitute any of the textures?
For a nutty twist, swap the cookie crumble for toasted hazelnuts or pecans. Want extra richness? Add a layer of chocolate ganache between tiers. The key is maintaining the texture contrast—if you remove one texture, replace it with something equally distinct (like a caramel drizzle or white chocolate shards).
Why does my mousse look grainy?
Grainy mousse usually means overmixing the egg whites or not folding gently enough. First, ensure your eggs are at room temperature—cold eggs won't whip properly. When folding, use a spatula to gently lift and turn the mixture, cutting through the center to avoid deflating the cream. Work quickly but carefully, and don't overfill your bowl—this makes folding harder.